William Wallace led the Scots to victory against the English in the battle of Stirling Bridge in 1297.
The National Wallace Monument was built between 1861 and 1869 and the conservation of the bronze statue had become necessary after 150 years of exposure to the weather. This is by any measure conservation on a colossal scale and we suspect that our author, accredited conservator Jim Mitchell of Industrial Heritage Consulting Ltd, downplays the challenges faced ”high on the monument in extreme weather conditions” As the statue is dismantled to be borne off to the workshop, it reveals the secrets of its original construction, proving yet again the ingenuity and skill of Victorian engineers and craftsmen – matched only by the ingenuity and skill of today’s conservators! - Lynette Gill, Icon News Editor
The story so far
Survey work on the 6m tall bronze statue revealed damage both to the statue and to the sandstone niche in which it stands, part way up a 67m high tower. A massive scaffolding was erected and the in situ dismantling of the statue got underway, starting with the sword arm and head. The process begins to shed light on how it had been assembled and erected.
CONSTRUCTION TECHNIQUE
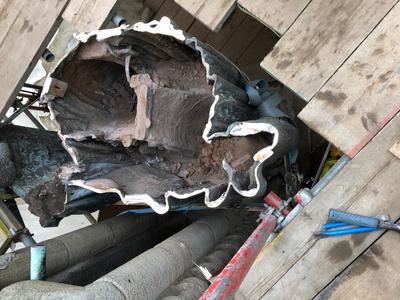
It was found that the torso and legs were filled with sand and gravel, pieces of wood, a few pieces of brick - basically fill, topped with a layer of moulding sand, all to make up the space below what was in fact, a casting bed. This was repeated at each joint level.
The statue is made up from eight different castings, jointed seamlessly when viewed from the outside. However, the clue to construction was literally writ in the sand. It has been deduced that, first of all, the legs were filled with sand up to where an internal locking wedge at the crotch proved that each leg was formed as a separate casting. The legs were then filled with sand and gravel up to the crotch level. This is indicated by the 1 on the diagram on page 18. A layer of ‘Mansfield Red’ (moulding sand) was levelled off at the joint line then depressed to form a trough and molten bronze poured in. This was almost certainly done at the foundry, as it would have been impossible in the 1870s to achieve 950 degrees centigrade, twenty metres up on a scaffold.
It is assumed that damp clay would have been pressed around the outside of the joint to retain the molten bronze until it cooled. The evidence of this pour was found in the form of spatter and overspill in the moulding sand as it was excavated. It is self-evident that the exterior surface was then beautifully hand tooled to match the surrounding moulded surfaces.
This process was repeated by filling up with more sand to the next level which was the waist / torso joint (at 2). This was keyed and locked into place internally and a new layer of moulding sand was then formed, and a second pour took place. A third fill formed a joint run at the cape and left arm joint - considerably more complicated, with almost vertical elements included, ending up at the left shoulder (3). This brought the sequential sand levels up to the lower left shoulder level: hence a statue full of sand that could not be removed.
As noted earlier, the remaining joints were keyed then leaded from the outside. The sole of the right foot was left open to allow most of the sand to be removed, but (we believe) temporarily plugged for the jointing work. It can only be assumed that for whatever reason, the sand was never removed, either deliberately or because of a blockage
This methodology came to make perfect sense but was not immediately apparent. When the statue was dismantled, each part was weighed and the sand was weighed, both totalling just under 2.5 tonnes. Stories have it that the statue weighed over three tons when installed. The additional weight could be ascribed partly at least to the sand being wetted for casting, miscalculation or even exaggeration. We can never be sure.
The frost-heave damage to the legs (which was limited considering its age) could be ascribed to the moisture in the sand freezing and expanding but as it gradually dried out, this damage would cease or reduce. However other repairs were found in these areas using molten tin, which was almost certainly carried out from the inside and therefore at the foundry, suggesting casting flaws.
The ‘ballast’ argument for the presence of the sand is further diminished by the presence of a stout iron rod, 47mm in diameter, screwed into the statue at pectoral height, sheathed in copper and run five metres diagonally through the corner of the building, above the window embrasure to the inside. Two smaller, 25mm bronze rods were fitted as shown overleaf, probably as stabilisers to eliminate gyratory movement in high winds. This, combined with the triangulated foot anchor points, nicely stabilised the structure.
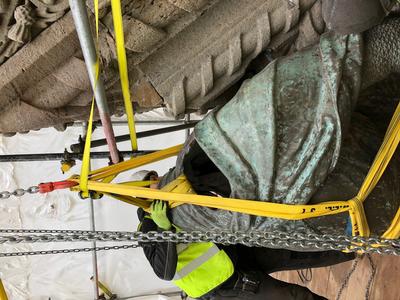
This shows the torso released and ready to lift. The proximity to the stone niche can be seen.
DISMANTLING & DISASSEMBLY
It was decided that dismantling would be carried out using the ‘reverse engineering’ principle by dismantling the statue in situ, following the assembly method used at the foundry. This allowed much more control and predictable behaviour of each part when lifted, thus ensuring the integrity of the surrounding stone niche, just a few centimetres away. A load cell (a spring balance with a dial) was fitted between the hand operated 3-tonne chain hoist and each lifted section. This meant that the precise load exerted could be compared to the estimated weight to ensure we were not trying to lift the whole monument!
Cutting the joints could never have been carried out with any accuracy without the evidence that was revealed when the head was removed. This allowed internal excavation of the sand - largely carried out with long-handled scoops and vacuuming. Finding the joints internally facilitated a line to be plotted externally and the cuts were made using 1.5mm-thick cutting wheels, reciprocating saws and hand-held blades, depending on the awkwardness of the cut. The process took several weeks and was the most challenging part of the work, high on the monument in extreme weather conditions.
As noted earlier, the statue was secured using three tie bars in total one of which had already fractured, weakened by an internal flaw. The feet were rooted about 70mm deep into the stone with tangs; two on the right foot, heel-and-toe and one on the left heel, allowing the left foot front to dramatically protrude over the edge of the stone. A fourth protruded from the shield tip down into a boulder-shaped piece of stone. All were sunk into cup-shaped indents, c.150mm in diameter and 120mm deep, then secured and topped out with molten lead. The heel of the left foot was set into the thinnest layer of the stone plinth and the heat of the original lead pour had induced hair-line fractures in the stone. This meant replacement would have to be approached differently.
Dismantling had to be carried out, whilst maintaining stability and being mindful of the nearby stonework, in sometimes ferocious weather conditions so the seven anchor points had to be maintained as long as possible. The tie-bars were progressively cut as the statue was dismantled, preventing undue stress to the adjoining stonework.
Stout ‘art’ cases were made to protect and transport each of the dismantled parts (six in all) so that they could be packed immediately before being lowered to the ground through the scaffolding. They were then taken to the workshop for de-sanding, assessment and weighing.
However, before heading for the workshop we had to consider the condition of the decorative niche, its over-mantle and pierced crown as well as the painted glass window, which seals off the 5m embrasure.
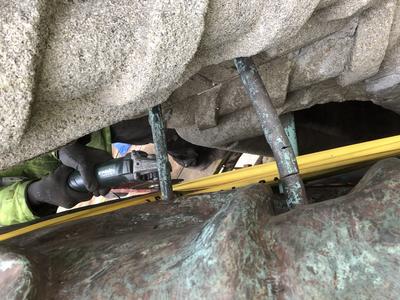
The bronze tie bars anchoring the statue to the stone work.
THE STONE
The monument was built using a coarse and open grained blonde or white sandstone. The large grained structure of the stone, with quartz and mica held in a relatively loose felsparic cementous mass, does not lend itself to intricate carving, making the detail achieved quite remarkable. However, the extreme exposure of the lofty location, facing into the prevailing wind, has meant that there was considerable erosion with, at some points, holes worn through the stone at the plinth corners by vortex action.
The surround to the niche canopy had suffered erosion and the crown is in a terminal condition. This superb piece of carving from a single block pierced through to create a three-dimensional feature was carved from the locally quarried stone - not really suitable for the level of carving required but a fine piece of work nevertheless. Due to budget and time restraints, the crown has been netted for safety and an agreement has been made between Stirling Council and Historic Environment Scotland for the crown to be replicated in Catcastle Buff, a blonde sandstone, to be reinstated at a future date.
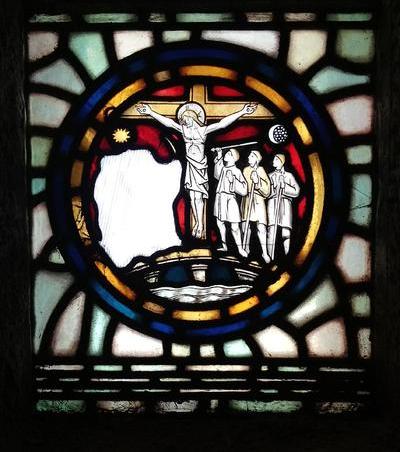
The damaged embrasure window with the broken piece removed in situ. The replacement piece is shown below.
THE WINDOW
The embrasure was closed off by a fine iron-framed painted stained glass window. This was heavily soiled and there was a clear hole through one section; probably dating back many decades. This was addressed after the statue removal by Linda Cannon ACR who carried out a finely detailed reconstruction and hand-painting of the broken part.
In the final instalment we will learn about the conservation treatment of the bronze statue back at the workshop and then the process of reinstallation
Article written by James Mitchell ACR of Industrial Heritage Consulting Ltd
Icon members get Icon News for free! Read the whole issue here.

